Have you applied for an Aadhaar but made a mistake while filling the information? You can conveniently correct it online without providing your mobile number.
As a part of the Aadhar Enrollment process, a resident’s personal, demographic and biometric data will be collected and processed for issuing them the Aadhar card. The mobile number provided by the resident at this point of time will be registered with the Aadhar database and the same will be used for any future reference or for updating/correcting details if any.
How To Do Aadhar Card Correction Online Without Mobile Number?
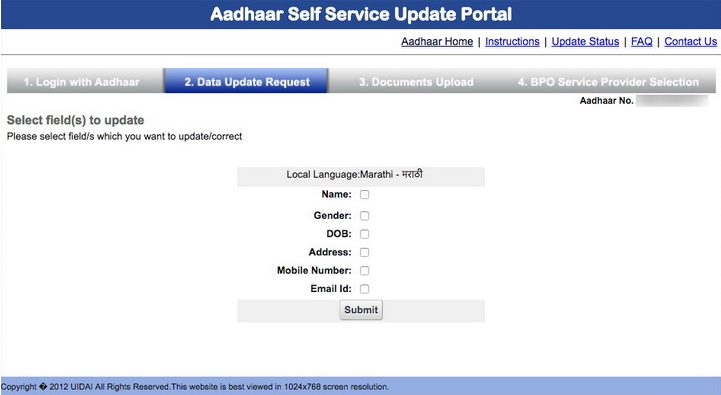
Before starting the process of an Aadhar card correction online without mobile number, residents should know that they can Update/Correct the following six information on their Aadhaar card/letter using the Aadhar Self Service Update Portal:
- Name
- Address
- Date of Birth
- Gender
- Mobile number
- Email Id
Mobile number is mandatory to receive the login password. If you don’t have your registered mobile number, then you have to go ahead with the following options to make an Aadhar card correction without mobile number:
Step 1: Add a mobile number by visiting the nearest Aadhar Update Centre OR Update the same in case of a wrong / older number is registered.
Step 2: Update the necessary data online through Aadhar Self Service Update Portal.
Add your Mobile number by Visiting the Nearest Aadhar Update Centre:
In case you have not registered your mobile number with the Aadhar database for some reason, then you will have to visit the nearest Aadhar Update Centre in person to update the information.
Update details online using this Registered Mobile Number:
Now that you have added your mobile number, any other Aadhar card correction/Updation can be done online through the UIDAI Aadhar Self Service Update Portal (SSUP).
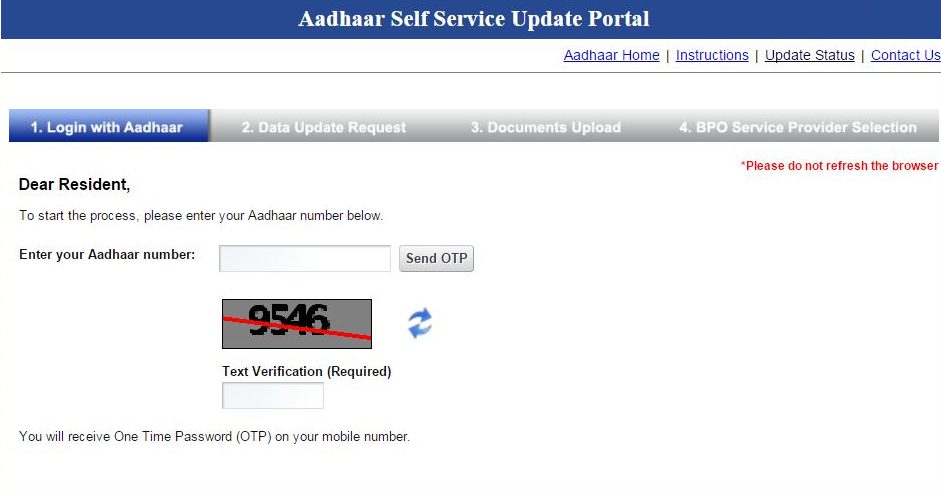
Step 1: Login with your Aadhar number
- Login to the SSUP.
- Enter your Aadhar number.
- You will receive a One-Time-Password (OTP) on your registered mobile number.
- Enter OTP and Captcha to log in to the Update Portal.

Step 2: Data Update Request
- Select the information you want to be updated /corrected. More than one information can be updated.
- Fill the fields with the details to be updated in English as well as in the local language.
- Review the data entered for correctness and completeness in English as well as in the local language.

Step 3: Documents Upload
- Depending on the information to be updated, upload the original scanned (with a color scanner) copies of the supporting documents as per the Valid Documents List.
- Name Correction/Update: Requires PoI listed in “Supported Proof of Identity(PoI) Documents Containing Name and Photo for Name Corrections/Update”.
- Date of Birth Correction: Requires DoB listed in “Supported Proof of Date of Birth (DoB) Documents”.
- Address Corrections/Change: Requires PoA listed in “Supported Proof of Address (PoA) Documents Containing Name and Address”.
- Email ID, Mobile, and Gender Change: No documents Required to be submitted for Mobile and Gender correction.
Step 4: Select the BPO Service Provider
- After uploading the supporting documents, select an appropriate option from the BPO Service Provider.
- Submit the request.
- For future reference and tracking note down your Update Request Number (URN) carefully. You can also download/Print your Acknowledgement copy.
In need of a small business loan, contact Gromor Finance. Gromor Finance gives quick unsecured business loans at attractive interest rates!


